This is my note for the event - ‘Building and testing apps for the Cloud’ hosted by the Research Software Engineering (RSE) team at The Hartree Centre. I’m going to share what I have learned and some thought from this event, and you might find it useful and interesting if you are interested in the following:
- best practice for building/testing cloud-native apps
- containerisation
- continuous integration, and
- continuous deployment
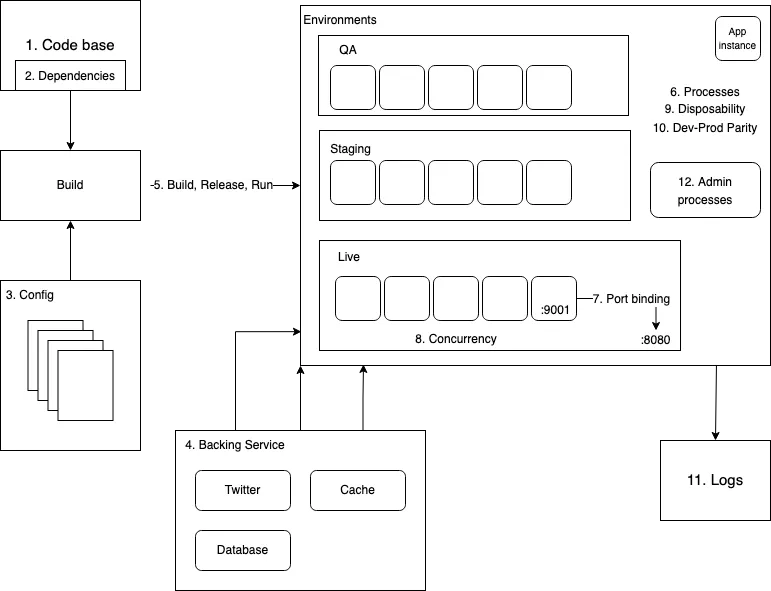
Twelve-factor methodology
The RSE team shared an industry-leading twelve-factor app methodology in which I have found really useful and beneficial. This methodology is specifically for designing and building software-as-a-service (SaaS) apps, but there are some factors which I think are also applicable in non-cloud environments. When I got introduced to this methodology, my immediate thought/question was: what are ideal ways to continuously deliver features without loss of efficiency, as the complexity and scale of the system increases? There is no golden approach to building a web application step by step, but this methodology is a very good place to start.
Now let’s take a look at each of the twelve factors to get an idea of these principles.
Image: a sketch of a 12-factors app
- Codebase - This principle states that you should have only one codebase even if you have multiple environments. This helps to maintain version control as everyone is working on the same repository, as well as keeping consistency across different environments.
- Dependencies - It is important to specify all dependencies for each individual app somewhere in the repository, however, dependencies should not include OS specific binaries that could lead to compatibility issues. Some well known dependency management tools are NPM for Javascript, RubyGem for Ruby, pip for Python, Composer for PHP, etc. I have also learned that JFROG is used widely in large software engineering teams or projects for artifact management, in this case it might be used for storing production files and dependencies packages.
- Config - Configurations (that vary between different environments) should be separate from code and injected into code logic when needed, i.e. they should not be declared as constants in the codebase. Instead, configurations and important credentials in twelve-factor apps are stored as secret/environment variables. This is very common on continuous integration tools.
- Backing Service - Any dependent components, or other application services such as databases, cache services, message queues, and third-party services, should be treated as external resources attached to the app, and accessed through network (URLs, or web addresses). For example, we can connect an Amazon RDS DB instance via
mydb.123456789012.us-east-1.rds.amazonaws.comor an local MySQL database viamysql://...@host/db. This principle will allow any attached resources to be replaced without modifying the code logic of the app, creating a fault tolerance app with high availability. Now the question is, what if the dependent services goes down? - Build, Release, Run - Before deploying the app, there are three stages that need to go through. During the build stage the codebase is used for compile executable binaries so the build artifact can be used elsewhere. The release stage combines the build artifact and the production environment configurations to produce a read-to-go release. And finally the run stage spins up everything and deploy the app (and dependencies) into the live environment. These stages are strictly separated and there are many benefits of automating this process using CI/CD.
- Processes - This factor stated that we should execute the app as one or more stateless processes and store any data (if required longer than the current session duration) in a stateful backing service such as databases or cache services. Therefore, sharing data between different processes of the app violates this factor, instead, use shared cache session instead of in-memory storage to prevent loss of data. Like me, you may find this factor difficult to understand initially, but keep in mind that this factor is essential for factor 8 and factor 9, as well as scalability of the application.
- Port Binding - This factor extends from the fourth factor (Backing service) and treats the app as a self-contained service which can be accessed via a URL by binding to a port. For non-cloud environments, port binding is often done by the webserver container such as Tomcat (port 8080) for Java and Node.js (port 3000) for Javascript. On the other hand, containers are widely used in cloud development and we can change and bind the port inside the dockerfile. You will see an example in the practical section soon.
- Concurrency - The app can scale out horizontally via the process model where we run multiple instances of the app at the same time, provided that the app does not violate the sixth factor. This means the app can have multiple workers that can handle more traffic and workload. Keep in mind that apps/backing services are far more fault tolerant on a horizontal scale than vertical scale.
- Disposability - This factor requires the app instance being able to be created or destroyed at any time with fast startup and graceful shutdown. In connection to the sixth factor, when a shutdown request is sent to the process (an running app instance), it should wait until all the current jobs are finished before cleaning up and exit; when the traffic increases, app instances should spin up very quickly to cope with the high workload. This page includes some process management tools which you may find interesting.
- Dev-Prod Parity - Keep development, staging, and production as similar as possible is the key of this factor, so the app should be designed for continuous deployment by keeping the gap between development and production to a minimum. The gap is not limited to time and tools, but also who is responsible for development and deployment.
- Logs - Treat logs as event streams. The app should continuously output time-ordered logs to
stdoutand/orstderrwhenever it is running. Such logs will provide useful insight for various stakeholders. A good destination of logs will be Splunk. - Admin processes - Any admin script should be separate from the app and its codebase, and stored in a separate repository. However, the admin processes should be run in the same environment of the app. Therefore, admin processes also need to go through the build, release, and run, three stages.
It is worth mentioning that, in my experience, factors 1, 2, 3, 5, 10 and 11 are also important and applicable for non-cloud developments.
This section is only scratching the surface of the methodology here and I recommend you to read through the documentation in detail by visiting 12factor.net. If you want to learn more about twelve factors in depth, checkout Beyond the Twelve-Factor App which added three additional factors on top of the original 12 factors.
Practical session I
This practical session is all about the (local) deployment of a full stack application using Docker containers. The full tutorial is kindly made available by Jim and you can find it on Gitlab so I won’t repeat the whole process again. In short, this is a simple React (A Javascript library) application with a graph displaying the temperatures of cities and the app is updated every 5 seconds. In the backend there is a Postgres timescale database and a GraphQL server sitting on top of the database for GraphQL API access.
Summarise as steps:
- Install Docker and apply version control for all codebases (one for the frontend and another for the GraphQL server).
- Store credentials using
echo "credential_value" | docker secret create credential_name - - Create a GraphQL server docker image from the GraphQL server repository using
docker build -f Dockerfile.prod -t fullstack/graphql .where-fspecifies the path of Dockerfile to build (or/Dockerfileby default) and-tspecifies the name and tag of the image in the formatname:tag. We can also create a test image for the server specifying the test procedure -docker build -f Dockerfile.test -t fullstack/graphql-test .. - Create a frontend docker production image from the React app repository using
docker build -t fullstack/frontend .. - Create a load balance image from nginx (dockerfile).
- Create a docker compose file
docker-compose-fullstack.yaml:
# Compose file specification version
version: '3.5'
services:
  # Create a timescale Postgres database from the image on Docker registry
  timescale:
    image: timescale/timescaledb:latest-pg12
    # Expose this service on port 5432 (first number)
    # (map from port 5432 from inside the container)
    ports:
      - "5432:5432"
    # store the password securely
    environment:
      POSTGRES_PASSWORD_FILE: /run/secrets/postgres_password
    # Specify what secrets to receive from the secret section
    secrets:
      - postgres_password
    # Location for permanent storage
    volumes:
      - db_data:/var/lib/postgresql/data
    # networks to join
    networks:
      - fullstack-network

  # GraphQL server
  graphql-engine:
    image: fullstack/graphql
    secrets:
      - postgres_password
    # Optional: load balance across multiple GraphQL Server
    deploy:
      # number of instances
      replicas: 3
      restart_policy:
        max_attempts: 3
        condition: on-failure
      # how the service should be updated
      update_config:
        # number of containers
        parallelism: 3
        # time between each update
        delay: 10s
    networks:
      - fullstack-network
    ports:
      - "9002:4000"
    # Run the server after the timescale service is started
    depends_on:
      - timescale

  # nginx
  proxy:
    image: fullstack/lb
    ports:
      - "8181:80"
    depends_on:
      - graphql-engine
    deploy:
      placement:
        constraints: [node.role == manager]
    networks:
      - fullstack-network

  frontend:
    image: fullstack/frontend
    ports:
      - "3000:3000"
    networks:
      - fullstack-network

# Location for permanent storage
volumes:
  db_data:

networks:
  graphql-network:
    driver: overlay
    attachable: true

# Defines all of the secrets
secrets:
  postgres_password:
external: true- Deploy all services using
docker stack deploy --compose-file docker-compose-fullstack.yaml --with-registry-auth fullstack-app. - Add sample data to the database using this format:
curl 'http://localhost:8181/graphql' -X POST -H 'content-type: application/json' --data '{ "query":"mutation { addTemperature(location: \"London\", temperature:18.0) }" }'- Check the web app at
localhost:3000.
Some notes for the docker-compose file:
-
volumes - this property will keep any data stored during the runtime of the container even if the container is removed.
-
networks - each service will create and join their own network (the name is equivalent to the name of the service) by default. Therefore, services are not able to communicate with each other. Assigning the same network will allow them to be discoverable to other services.
-
nginx
-
nginx.conf
# proxy request to a group of servers named 'loadbalance' upstream loadbalance { least_conn; server graphql-engine:4000; } # pass any requests to loadbalance servers server { location / { proxy_pass http://loadbalance; } } -
Dockerfile
FROM nginx RUN rm /etc/nginx/conf.d/default.conf COPY nginx.conf /etc/nginx/conf.d/default.conf -
add data using
localhost:8181(nginx) instead oflocalhost:9002(GraphQL server) so that requests can be distributed across multiple server instances.
-
-
Compose specification - visit Docker Docs to see the full definitions.
The great thing about this process is that we can now upload images for the whole application to any service providers for deployment and containers can be spun up in no time!
My key takeaways and thoughts from this session:
- containers are good for automated testing, especially when you need to run end-to-end tests on multiple browsers across different operating systems which could cause significant differences in the image snapshots that are taken for your web app during the test. For example, when you use a Windows machine to generate and update snapshots and all tests run fine pre-commit. However, when the GitHub CI workflow picks up the new source code and runs in a Ubuntu container, errors will be thrown because snapshots vary in different OS. The drawback is that if you trigger the automated testing using the pre-commit hook, everyone who contributes to the project will need to either skip the tests, or need to have Docker installed.
- factors 1, 2, 3, 5, 10, and 11 are also good practices for non-cloud web developments. If you ever deploy a static site (built from a front-end framework/library) on GitHub Pages using GitHub Actions, you will find these factors extremely helpful. Although the 11th factor is less relevant in static sites.
- automation and resilience should be key goals to any process - the application of these factors leads you to automated testing, automated deployment, auto-scaling, and monitoring.
- after I’ve spent some time digging into the docker world then I think I should definitely go forward and consume more sysadmin knowledge!
Practical session II
The second practical session focused on developing applications on AWS, we were using a virtual machine on AWS EC2 to develop and deploy a RESTful API as well as setting up CI/CD pipeline on GitLab.
Here’s a broad summary of the setup:
- Connect the AWS EC2 virtual machine using SSH and set up AWS CLI.
- Clone and setup Git repository on the VM, tag the commit along the development.
- Build and run the API server using the Task task runner via the file
Taskfile.yml. - Containerised the server by creating a
Dockerfilewhich contains multiple stages:- Build*
- Dependencies and cache
- Runner
- Upload* images to a private repository in AWS.
- Config Docker to use
amazon-ecr-credential-helperfor the authentication of the private repository. - [CI] Register GitLab runner on AWS VM. Add CI code linting* and create
gitlab-ci.ymlwithlintandbuildtwo jobs. - [CD] Add credentials of the private repository to the GitLab CI/CD page, then add the
deployjob to thegitlab-ci.ymlso the image will be pushed to the repository whenever a commit is made on thedevbranch or when a tag is created. - Create a
docker-compose.yamlfile which runs the image from the private repository as a service. - Setup the Watchtower tool as a separate running service so the API server will be re-deployed whenever the tool finds a new update to the image. The private repository credentials are passed via a volume.
- Add a production service for the API server and expose it to the external world via port 80.
- Ta-da! An automated CI and CD pipeline is created and all we need to do is to continuously add new features to the API server.
(*) indicates that these actions have been captured as tasks in the
Taskfile.yml. There are other tasks such as clean and *format* which are not mentioned above.
One of the key takeaways of this session for myself is to automate anything I can and make use of tools like Task or GNU make. By doing so it will help you to run a series of tedious commands, integrate with any workflows that may arise in the future, and reduce the chance of human errors. I have used npm a lot and often use the package.json file for storing simple scripts. Store complicated scripts in the same file wouldn’t be ideal and sometimes cause OS compatibility issues and brings up confusion. One of the use cases of Task would be installation. When contributors fork and clone your project they wouldn’t want a long README file and have to run many commands to set up. If we can put everything in a single Taskfile and only run a minimal number of commands to get everything ready for development, much time would be saved for everyone. When it comes to large projects which may involve hundreds of microservices, such tools would make a huge difference.
Beside the setup, there are two things in the tutorial that have drawn my attention. The first one is Semantic Versioning (SemVer) and the latter is how to write a git commit message. SemVer is a convention/scheme for version numbers and has been widely adopted in the NPM ecosystem. Although it is mainly for packages or libraries, I believe it is also useful for web applications or static websites. Separating the development history by version numbers helps to keep track of what’s been changed at any given time interval, and it is a great source of information that can turn into changelogs for stakeholders when combined with good commit messages. Over the past months, I have started to follow the Angular commit message guidelines and try to steer away from vague messages like update, fix bug, create ***. Not only have I got pull requests that are structured and easy to review, it also helped me to track past history very quickly on several occasions.
Summary
- Start to adopt 12-factors methodology
- Sysadmin skills is essential for cloud development
- Containerisation and CI/CD would be a standard for projects
- Automate everything you can and make use of tools like Task / Make (build tools)
- Organise and track the project using Semantic Versioning
- Good commit messages make the difference!